Lighting For Green Screen: How to Avoid Costly Mistakes in Lighting Projects
When it comes to green screen projects, lighting plays a pivotal role in achieving seamless results. Proper lighting not only enhances the quality of the footage but also minimizes post-production challenges. For lighting contractors, understanding the nuances of lighting for green screens is essential to avoid costly mistakes that can derail a project. This article delves into the key aspects of lighting for green screens, providing insights and tips to ensure success.
Understanding the Importance of Lighting in Green Screen Projects
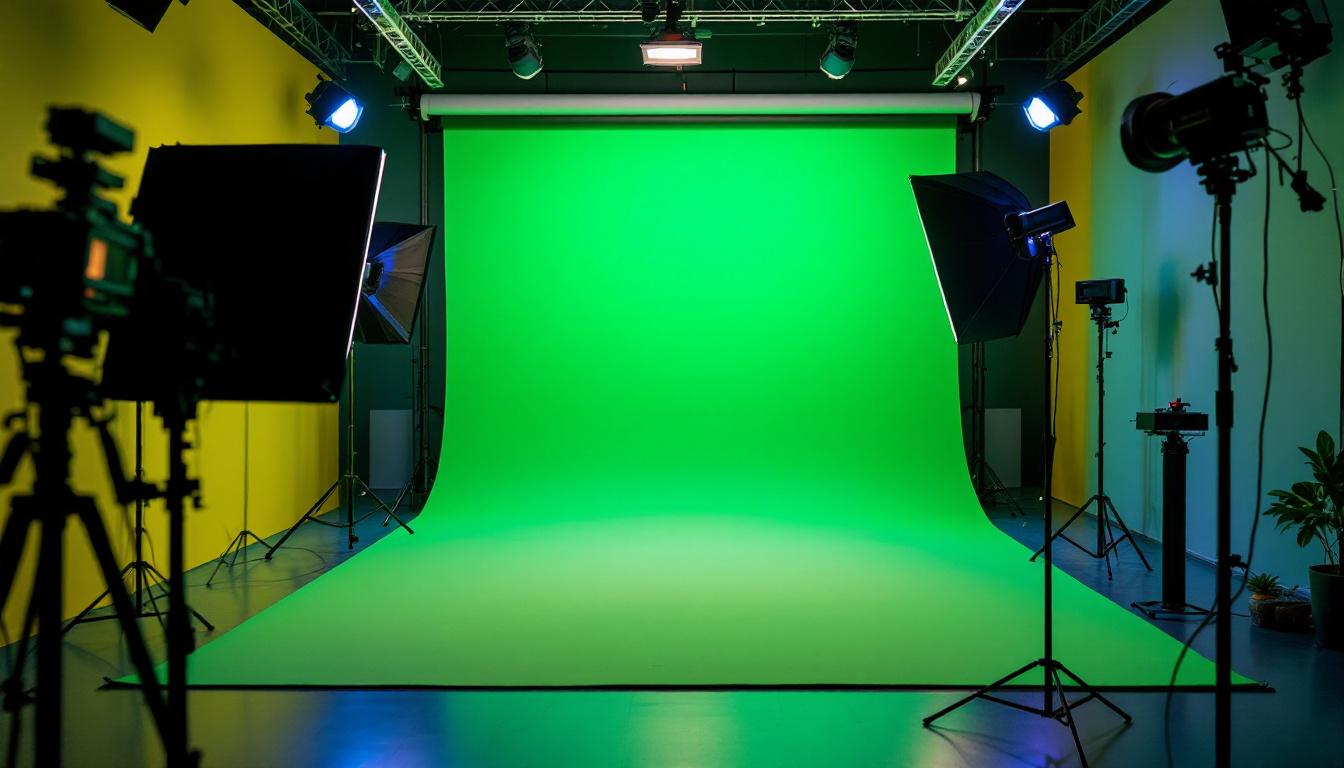
Green screens, or chroma key backgrounds, are widely used in film, television, and photography to create stunning visual effects. The effectiveness of this technique largely depends on how well the green screen is lit. Poor lighting can lead to shadows, uneven color distribution, and an overall unprofessional look.
Lighting sets the mood and tone of the project, influencing how the final product is perceived. When the lighting is executed correctly, it allows for smooth keying during post-production, resulting in a polished and professional appearance. Conversely, mistakes in lighting can lead to additional costs and extended timelines as teams may need to re-shoot or spend excessive time in post-production correcting errors. Moreover, the choice of lighting can also affect the color grading process, as different light temperatures can shift the hues and saturation of the final image, complicating the editing process.
Common Mistakes in Green Screen Lighting
Several common pitfalls can occur during the lighting process, each with its own set of consequences. Understanding these mistakes can help contractors avoid them and ensure a smoother workflow.
One frequent error is the use of inadequate lighting equipment. Insufficient lighting can create shadows and uneven color, making it difficult to achieve a clean key. Additionally, using lights that are too harsh can create hotspots, resulting in an unnatural look. It’s crucial to select the right type of lights and to position them correctly to achieve even illumination. Furthermore, failing to account for the distance between the subject and the green screen can exacerbate these issues. If the subject is too close, it can cast shadows on the backdrop, while being too far away might result in color spill, where the green reflects onto the subject, complicating the keying process.
Key Lighting Techniques for Green Screens
To achieve optimal results, specific lighting techniques should be employed. One effective method is to use soft lighting, which helps to minimize shadows and create a more even distribution of light across the green screen. Softboxes or diffused light sources can be particularly useful in achieving this effect.
Another technique involves using backlighting or rim lighting. This method adds depth to the subject by creating a separation between the subject and the green screen. It helps to define the edges of the subject, making it easier to key out the background during post-production. Additionally, using a three-point lighting setup can enhance the overall quality of the shot. This involves key light, fill light, and backlight working in harmony to illuminate the subject while maintaining a balanced exposure. This comprehensive approach not only improves the visual appeal but also ensures that the subject stands out against the green screen, facilitating a seamless integration of backgrounds during editing.
Choosing the Right Equipment
The selection of lighting equipment is crucial in achieving the desired results in green screen projects. Various types of lights are available, each with its own advantages and disadvantages. Understanding these options can help contractors make informed decisions.
Types of Lights for Green Screen Lighting
LED lights have gained popularity in recent years due to their versatility and energy efficiency. They produce minimal heat and can be adjusted for brightness and color temperature, making them ideal for green screen applications. Furthermore, their compact size allows for easy placement in tight spaces. Additionally, many modern LED lights come with built-in dimming capabilities and color gels, further enhancing their adaptability for different shooting scenarios. This flexibility makes them a favorite among filmmakers who need to achieve specific moods or effects with minimal fuss.
Fluorescent lights are another excellent choice for green screen lighting. They provide a soft, even light that helps to reduce shadows. However, it’s essential to select high-quality fluorescent bulbs to avoid flickering and color inconsistencies. These lights are often used in larger setups, as they can cover a wide area without the harshness associated with some other types of lighting. Moreover, fluorescent lights are available in various color temperatures, allowing for precise matching with other light sources, which is crucial for maintaining a consistent look across different shots.
Light Placement Strategies
The placement of lights is as important as the type of lights used. A common strategy is to use a three-point lighting setup, which includes key lights, fill lights, and backlights. The key light is the primary source of illumination, while the fill light softens shadows created by the key light. The backlight adds depth and dimension to the subject. This arrangement not only enhances the visual appeal but also ensures that the green screen is evenly lit, which is vital for effective keying in post-production.
For green screens, it’s also important to position lights at a distance that allows for even coverage without creating hotspots. Lighting should be placed at a 45-degree angle to the subject and the green screen to achieve optimal results. Additionally, using softboxes or diffusion materials can help to further soften the light, reducing harsh shadows and creating a more natural look. Experimenting with different angles and distances can lead to discovering the perfect setup that complements the specific scene being filmed, allowing for greater creative expression and technical precision in the final output.
Setting Up the Green Screen
In addition to lighting, the setup of the green screen itself plays a significant role in the overall success of the project. Proper tension and smoothness of the green screen fabric are essential to avoid wrinkles and folds that can interfere with keying. A well-set green screen not only enhances the visual quality but also saves time during the editing process, as fewer adjustments will be needed in post-production.
Choosing the Right Green Screen Material
There are various materials available for green screens, including fabric, vinyl, and paint. Each material has its pros and cons. Fabric screens are portable and easy to set up, but they can wrinkle easily. Vinyl screens are more durable and provide a smooth surface, but they can be heavier and less portable. When selecting a material, consider the specific needs of your project, such as the frequency of use and the environment in which you will be filming.
Painted green screens can be a cost-effective option, but they require careful application to ensure an even surface. It’s advisable to use high-quality paint specifically designed for chroma keying, as this can significantly improve the keying process. Regardless of the material chosen, it’s crucial to ensure that the green screen is free from imperfections that could affect the keying process. Regular maintenance and cleaning of the screen can also prolong its lifespan and maintain its effectiveness.
Maintaining Proper Distance Between Subject and Screen
To achieve the best results, maintaining an adequate distance between the subject and the green screen is essential. This distance helps to prevent shadows from being cast on the screen and reduces the risk of green spill, where the green color reflects onto the subject. Additionally, the distance allows for better depth of field, which can add a more professional touch to the final product.
A distance of at least six to ten feet is often recommended, depending on the lighting setup and the size of the subject. This space allows for better lighting control and enhances the overall quality of the footage. When positioning the subject, consider the angles of the lights and how they interact with both the green screen and the subject. Using softbox lights or diffusers can help create a more even lighting effect, which is crucial for achieving a seamless keying result. Furthermore, experimenting with different distances and angles during test shoots can provide invaluable insights into what works best for your specific setup.
Post-Production Considerations
Even with the best lighting setup, post-production plays a crucial role in achieving a polished final product. Understanding how lighting affects post-production processes can help contractors prepare for potential challenges.
Color Grading and Correction
After filming, color grading and correction are often necessary to achieve the desired look. Proper lighting can significantly reduce the amount of color correction needed during post-production. When the green screen is evenly lit, it allows for smoother keying and less adjustment in color grading.
However, if mistakes are made during the lighting process, post-production teams may spend excessive time correcting color inconsistencies, which can lead to increased costs and delays. Therefore, it’s essential to prioritize proper lighting to minimize these challenges.
Testing and Adjustments
Before finalizing the lighting setup, conducting tests can be invaluable. Filming test shots allows contractors to evaluate the effectiveness of the lighting and make necessary adjustments. This process can help identify any potential issues before the actual shoot, saving time and resources.
Additionally, testing different lighting angles and intensities can help achieve the best results. It’s important to be flexible and willing to make adjustments based on the test footage to ensure a successful final product.
Conclusion: The Key to Successful Green Screen Lighting
Lighting for green screen projects is a complex but rewarding endeavor. By understanding the importance of proper lighting, selecting the right equipment, and employing effective techniques, lighting contractors can avoid costly mistakes and deliver high-quality results. Attention to detail in both lighting and green screen setup is essential to achieving a seamless keying process and a professional final product.
Ultimately, the success of a green screen project hinges on the careful planning and execution of lighting strategies. By prioritizing these elements, contractors can ensure that their projects not only meet but exceed client expectations, paving the way for future opportunities in the competitive world of film and media production.
Illuminate Your Green Screen Projects with LumenWholesale
Ready to elevate your green screen lighting to professional standards? Look no further than LumenWholesale for all your lighting needs. Our extensive selection of spec-grade lighting products ensures that you have access to the best tools for the job, at prices that respect your budget. Say goodbye to local distributor markups and hello to top-quality lighting that meets the highest industry standards. With LumenWholesale, bulk buying is a breeze, and with free shipping included, you’re guaranteed premium lighting solutions at the best value. Don’t compromise on quality or cost—visit Wholesale Lighting at the Best Value and make your next green screen project a shining success.