As the demand for energy-efficient lighting continues to rise, LED pot lights have become a popular choice among homeowners and contractors alike. These fixtures not only provide excellent illumination but also enhance the aesthetic appeal of any space. For lighting contractors looking to expand their service offerings, understanding how to install LED pot lights in existing ceilings can open up new opportunities. This article delves into practical installation techniques, tools required, and real-world success stories that illustrate the benefits of LED pot lights.
Understanding LED Pot Lights
LED pot lights, also known as recessed lights, are fixtures that are installed into a hollow opening in the ceiling. They provide a sleek, modern look and can be used for various applications, from accent lighting to general illumination. Unlike traditional bulbs, LED lights consume less power and have a longer lifespan, making them a cost-effective choice for both contractors and homeowners.
Benefits of LED Pot Lights
One of the primary advantages of LED pot lights is their energy efficiency. They use significantly less electricity compared to incandescent or fluorescent lights, which translates to lower utility bills for homeowners. Additionally, LED lights emit less heat, reducing the load on air conditioning systems during warmer months.
Another benefit is their versatility. LED pot lights come in various sizes, shapes, and color temperatures, allowing contractors to tailor their installations to meet specific client needs. Whether it’s creating a cozy atmosphere in a living room or providing bright, focused lighting in a kitchen, LED pot lights can be adapted to suit any environment.
Types of LED Pot Lights
When considering LED pot lights, it’s essential to understand the different types available. Some common options include:
- Adjustable LED Pot Lights: These fixtures can be tilted to direct light where it’s needed most, making them ideal for highlighting artwork or architectural features.
- Fixed LED Pot Lights: These are designed to provide consistent, even lighting and are often used for general illumination.
- Smart LED Pot Lights: With the rise of smart home technology, these lights can be controlled via smartphone apps or voice-activated devices, offering convenience and customization.
Preparation for Installation
Before diving into the installation process, proper preparation is crucial. This phase involves assessing the existing ceiling, gathering necessary tools, and planning the layout of the pot lights.
Assessing the Ceiling
Begin by examining the ceiling structure. Determine if it is a drywall, plaster, or another material, as this will influence the installation method. Additionally, check for any obstructions such as beams, ductwork, or plumbing that may interfere with the placement of the pot lights.
It’s also essential to consider the spacing of the lights. A general rule of thumb is to space pot lights approximately 4 to 6 feet apart for optimal coverage. However, this can vary based on the height of the ceiling and the desired lighting effect.
Gathering Tools and Materials
Having the right tools on hand can streamline the installation process. Essential tools include:
- Drill and drill bits
- Wire strippers
- Voltage tester
- Measuring tape
- Level
- Safety goggles and gloves
In addition to tools, ensure that the necessary materials are ready. This includes the LED pot lights, electrical wiring, junction boxes, and any additional hardware required for installation.
Step-by-Step Installation Process
Now that the preparation is complete, it’s time to move on to the installation process. Following a systematic approach will ensure a successful outcome.
Step 1: Turn Off Power
Safety should always be the top priority. Before starting any electrical work, turn off the power at the circuit breaker to avoid any risk of electric shock. Use a voltage tester to confirm that the power is off.
Step 2: Mark the Locations
Using the measuring tape, mark the locations where the pot lights will be installed. A pencil can be used for precise markings. Ensure that the marks are evenly spaced and aligned for a professional finish.
Step 3: Cut the Holes
With the marked locations established, use a drywall saw to cut holes in the ceiling. The size of the holes will depend on the specific pot lights being installed, so refer to the manufacturer’s instructions for guidance. Take care to avoid any electrical wiring or plumbing that may be hidden behind the ceiling.
Step 4: Install the Junction Box
Next, install a junction box for each pot light. This is where the electrical connections will be made. Secure the junction box to a ceiling joist or beam, ensuring it is stable and meets local electrical codes.
Step 5: Run Electrical Wiring
Run the electrical wiring from the power source to each junction box. Ensure that the wiring is secured and protected according to local regulations. It’s crucial to use the appropriate gauge wire for the load to prevent overheating.
Step 6: Connect the Pot Lights
With the wiring in place, connect the pot lights to the junction boxes. Follow the manufacturer’s instructions for making the connections, ensuring that the wires are securely fastened and properly insulated. Once all connections are made, push the wiring back into the junction box.
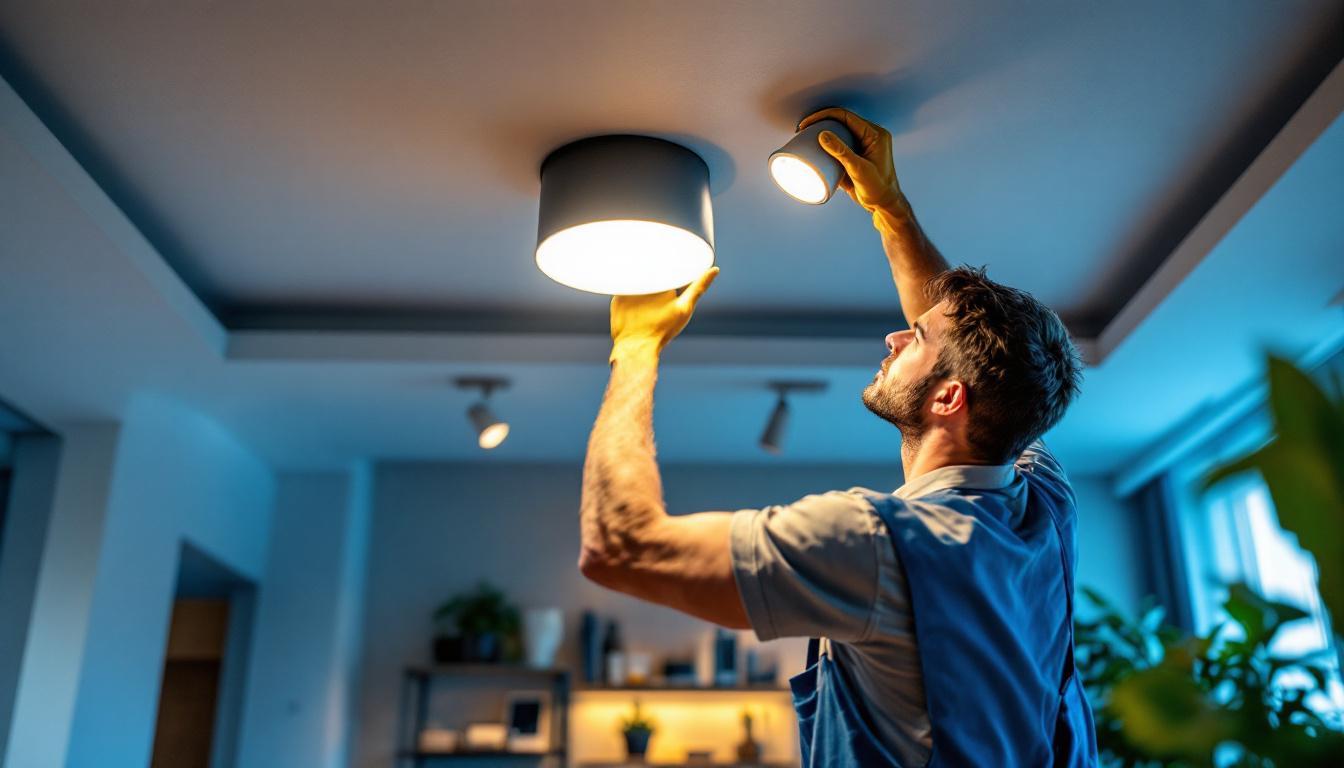
Step 7: Install the Pot Lights
Now it’s time to install the pot lights themselves. Carefully insert the fixtures into the holes cut earlier, ensuring they are flush with the ceiling. Most LED pot lights come with spring clips that hold them securely in place.
Step 8: Restore Power and Test
Once all pot lights are installed, restore power at the circuit breaker. Turn on the lights to test their functionality. If everything is working correctly, the installation is complete. If any lights do not function, double-check the wiring connections.
Real-World Success Stories
Understanding the installation process is essential, but seeing how others have successfully implemented LED pot lights can provide valuable insights. Here are a few real-world success stories from lighting contractors who have embraced this trend.
Case Study 1: Residential Home Renovation
A lighting contractor was hired to renovate a dated home that had outdated fluorescent fixtures. The homeowner desired a modern, energy-efficient lighting solution. The contractor proposed installing LED pot lights throughout the main living areas.
After assessing the ceiling structure and planning the layout, the contractor successfully installed the pot lights in a single day. The result was a dramatic transformation, with the new lighting enhancing the home’s aesthetic appeal and providing better illumination. The homeowner reported significant energy savings and expressed satisfaction with the outcome.
Case Study 2: Commercial Office Space
In another instance, a contractor was tasked with upgrading the lighting in a commercial office space. The existing fluorescent lights were not only energy-inefficient but also provided inadequate lighting for the employees. The contractor recommended replacing them with LED pot lights.
By strategically placing the pot lights to eliminate dark spots and improve overall brightness, the contractor enhanced the work environment. Employees reported increased productivity and satisfaction with the new lighting. The business owner was thrilled with the reduced energy costs and the modern look of the office.
Case Study 3: Retail Store Revamp
A retail store owner wanted to revamp the lighting to better showcase products and create an inviting atmosphere. The contractor suggested installing adjustable LED pot lights to highlight specific areas of the store while providing general illumination.
The installation process was seamless, and the results were impressive. The adjustable lights allowed the store owner to direct light precisely where it was needed, enhancing product visibility and creating a warm ambiance. Sales increased as a direct result of the improved lighting, showcasing the value of LED pot lights in a retail setting.
Best Practices for Lighting Contractors
For lighting contractors looking to excel in LED pot light installations, adhering to best practices is essential. Here are some tips to ensure success:
Stay Updated on Technology
The lighting industry is constantly evolving, with new technologies and products emerging regularly. Staying informed about the latest advancements in LED technology can help contractors offer the best solutions to their clients. Attend trade shows, workshops, and training sessions to keep skills sharp and knowledge current.
Focus on Customer Education
Educating clients about the benefits of LED pot lights and the installation process can build trust and enhance customer satisfaction. Providing clear explanations and addressing any concerns can lead to repeat business and referrals.
Ensure Compliance with Local Codes
Every installation must comply with local electrical codes and regulations. Familiarize yourself with these requirements to avoid potential issues. Proper documentation and adherence to safety standards not only protect the contractor but also ensure the safety of the homeowner.
Conclusion
Installing LED pot lights in existing ceilings presents an excellent opportunity for lighting contractors to expand their service offerings and meet the growing demand for energy-efficient lighting solutions. By understanding the installation process, learning from real-world success stories, and adhering to best practices, contractors can deliver exceptional results that enhance both the functionality and aesthetics of any space.
As the industry continues to evolve, embracing new technologies and techniques will be key to staying competitive. By investing in knowledge and skills, lighting contractors can position themselves as experts in LED pot light installations, ultimately leading to increased customer satisfaction and business growth.
Get Your LED Pot Lights at LumenWholesale
Ready to take your lighting projects to the next level? At LumenWholesale, we provide lighting contractors with the highest quality LED pot lights at unbeatable wholesale prices. Say goodbye to local distributor markups and hello to spec-grade lighting that meets the highest industry standards. With our hassle-free bulk buying and free shipping, you can trust that you’re getting premium lighting at the best value — all without hidden fees or compromises. Elevate your installations with the perfect blend of quality, affordability, and convenience. Visit LumenWholesale today and experience Wholesale Lighting at the Best Value for your next project.