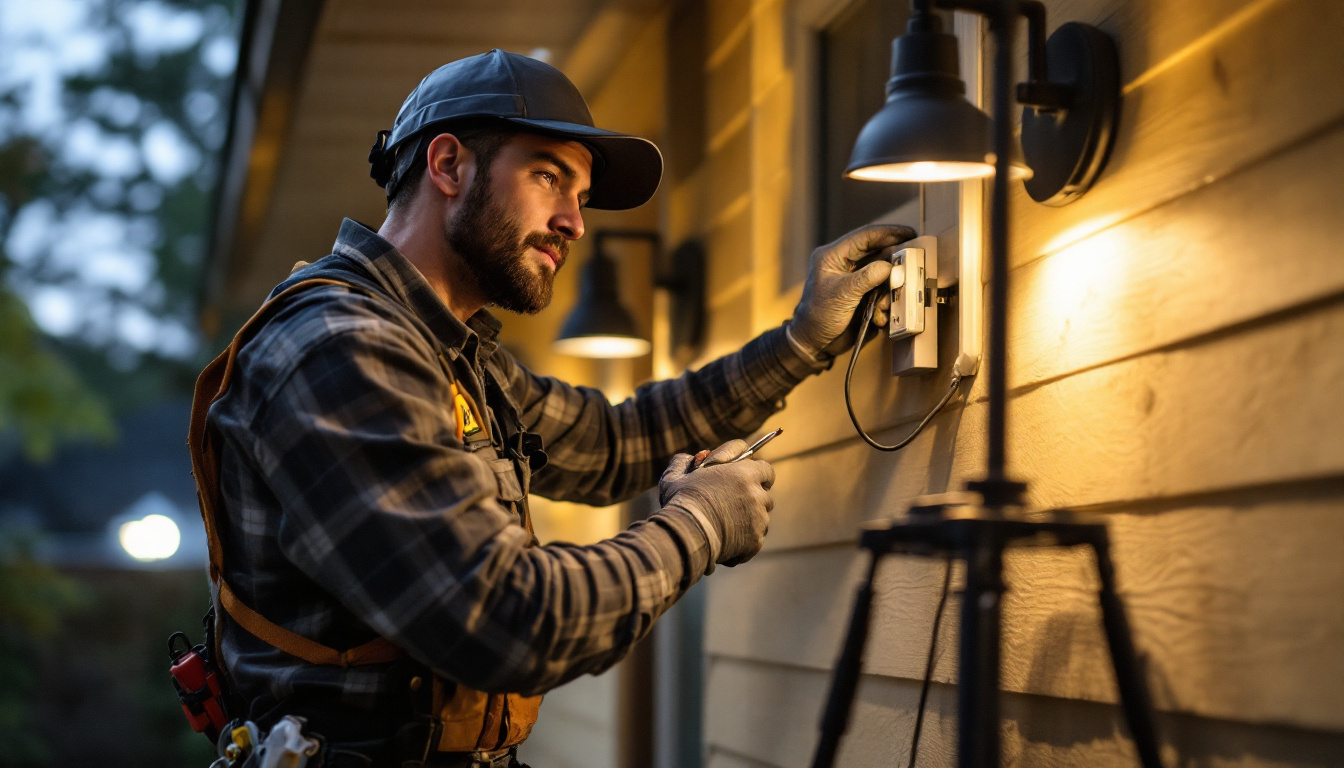
In the world of electrical installations, particularly in outdoor settings, the importance of using the right tools and components cannot be overstated. One such essential component is the exterior 2 gang extender. This device plays a crucial role in ensuring that lighting fixtures are securely mounted and properly connected, allowing for both safety and functionality. For lighting contractors, understanding the features, benefits, and installation processes associated with exterior 2 gang extenders is vital for delivering high-quality work to clients.
Understanding the Exterior 2 Gang Extender
The exterior 2 gang extender is designed to provide additional space for wiring and connections in outdoor electrical boxes. These extenders are particularly useful when existing boxes are not deep enough to accommodate the necessary wiring or when additional fixtures need to be added to an existing setup. By utilizing these extenders, contractors can enhance the aesthetic appeal and functionality of outdoor lighting systems.
Key Features of Exterior 2 Gang Extenders
Exterior 2 gang extenders come with a variety of features that make them suitable for outdoor applications. Firstly, they are typically made from weather-resistant materials, ensuring durability against harsh environmental conditions. This is crucial for outdoor installations, where exposure to moisture, sunlight, and temperature fluctuations can affect the longevity of electrical components.
Another important feature is the design of the extender itself. Most extenders are designed to accommodate standard 2 gang switch or outlet configurations, making them versatile for various lighting applications. Additionally, many extenders include built-in gaskets or seals to prevent water ingress, further enhancing their suitability for outdoor use. Some models even offer UV resistance, which helps prevent fading and degradation over time, ensuring that the extenders maintain their appearance and functionality for years to come.
Benefits for Lighting Contractors
For lighting contractors, using exterior 2 gang extenders offers several benefits. Firstly, they simplify the installation process by providing the necessary space for wiring. This can significantly reduce the time spent on each project, allowing contractors to take on more jobs and increase their overall productivity.
Moreover, the use of extenders can enhance the safety of electrical installations. By ensuring that all wiring is properly housed and protected, contractors can minimize the risk of electrical hazards, which is essential for maintaining client trust and satisfaction. Additionally, these extenders can help in meeting local electrical codes and regulations, which often require specific clearances and protections for outdoor installations. This compliance not only protects the contractor from potential fines but also reassures clients that their installations are up to standard.
Furthermore, exterior 2 gang extenders can also facilitate future upgrades or modifications. With the added space, contractors can easily incorporate new technologies, such as smart lighting systems or additional outlets for outdoor devices. This adaptability is particularly appealing to homeowners who may want to enhance their outdoor living spaces with features like landscape lighting or decorative fixtures, allowing contractors to offer a broader range of services and solutions tailored to their clients’ evolving needs.
Installation Process for Exterior 2 Gang Extenders
Installing an exterior 2 gang extender may seem straightforward, but it requires careful attention to detail to ensure a safe and effective installation. Below is a step-by-step guide to help lighting contractors navigate the installation process.
Preparation and Tools Required
Before beginning the installation, it is essential to gather the necessary tools and materials. Common tools required include a screwdriver, wire cutters, wire strippers, and a voltage tester. Additionally, having the right materials on hand, such as the extender itself, weatherproof gaskets, and electrical tape, will streamline the process. Ensuring that all tools are in good working order can save time and prevent frustration during the installation.
Once the tools are ready, the contractor should ensure that the power to the existing electrical box is turned off. This is a critical safety step that should never be overlooked. Using a voltage tester can help confirm that the power is indeed off before proceeding. It’s also wise to inform anyone nearby that work is being done, as this can help prevent accidental power restoration while you’re in the middle of your installation.
Step-by-Step Installation Guide
1. **Remove the Existing Cover Plate**: Begin by unscrewing the cover plate from the existing electrical box. This will expose the wiring and allow for the installation of the extender. Take care to keep the screws in a safe place, as they will be needed later for securing the extender.
2. **Disconnect the Wiring**: Carefully disconnect the wires from the existing box. It is advisable to take a photo or make a note of how the wires are connected to ensure they can be reattached correctly later. Labeling the wires can also be beneficial, especially in cases where multiple circuits may be involved, to avoid any confusion during reconnection.
3. **Attach the Extender**: Position the exterior 2 gang extender over the existing box. Align it with the mounting holes and secure it in place using screws. Ensure that the extender is level and flush against the wall. If the wall surface is uneven, consider using shims to achieve a proper fit, which will help maintain the integrity of the installation and prevent water intrusion.
4. **Reconnect the Wiring**: Once the extender is securely installed, reconnect the wiring according to the notes or photos taken earlier. Make sure to use wire nuts to secure connections and wrap them with electrical tape for added safety. Double-check that there are no exposed wires, as this can pose a significant safety hazard.
5. **Install the New Cover Plate**: After the wiring is connected, attach the new cover plate that comes with the extender. This plate should fit snugly over the extender, providing a clean and finished look. Consider using a weatherproof cover if the installation is in an area exposed to the elements, as this will enhance durability and protect the electrical components.
6. **Restore Power and Test**: Finally, turn the power back on and test the new installation to ensure everything is functioning correctly. This step is crucial to confirm that the installation was successful and safe. If any issues arise, such as flickering lights or non-functioning outlets, it may be necessary to turn the power off again and recheck the wiring connections for any mistakes or loose ends.
Additionally, it’s important to be aware of local building codes and regulations regarding electrical installations. Compliance not only ensures safety but also protects against potential fines or issues during home inspections. Keeping abreast of these regulations can help contractors provide the best service and maintain a good reputation in the industry.
Common Challenges and Solutions
While installing exterior 2 gang extenders is generally a straightforward process, contractors may encounter some challenges. Being prepared for these issues can save time and ensure a successful installation.
Dealing with Limited Space
One common challenge is limited space around the existing electrical box. In such cases, it may be necessary to adjust the placement of the extender or even relocate the box entirely. This can involve additional work, such as cutting new holes in the wall or using longer mounting screws to secure the extender properly. It’s also wise to consider the layout of surrounding fixtures and landscaping, as these can affect both the accessibility and functionality of the extender. Planning ahead by measuring the space and visualizing the final setup can help mitigate these issues before they arise.
Moisture and Weatherproofing Issues
Another potential issue is ensuring that the installation is completely weatherproof. Contractors should always double-check that all seals and gaskets are properly installed and that there are no gaps where moisture could enter. Using silicone sealant around the edges of the extender can provide extra protection against the elements. Additionally, it’s important to select extenders that are specifically rated for outdoor use, as these often come with enhanced features like UV resistance and reinforced materials. Regular maintenance checks post-installation can also help identify any wear or damage that could compromise the weatherproofing over time.
Electrical Load Considerations
When installing exterior 2 gang extenders, contractors must also consider the electrical load that will be placed on the system. Each extender has a maximum capacity that should not be exceeded, as overloading can lead to overheating and potential fire hazards. It’s essential to assess the total wattage of all devices that will be connected to the extender and ensure that it falls within the safe operating limits. In some cases, it may be necessary to consult with an electrician to evaluate the existing wiring and make any necessary upgrades to accommodate the additional load safely.
Compliance with Local Codes
Lastly, compliance with local electrical codes is crucial during installation. Different regions may have specific regulations regarding outdoor electrical installations, including requirements for conduit types, grounding methods, and circuit protection. Familiarizing oneself with these codes not only ensures safety but also helps avoid potential fines or the need for costly rework. Contractors should always check for the latest updates to local regulations and, if necessary, obtain the appropriate permits before commencing work. This proactive approach can streamline the installation process and enhance the overall quality of the project.
Best Practices for Lighting Contractors
To maximize the effectiveness of exterior 2 gang extenders, lighting contractors should adhere to best practices during installation and maintenance. These practices not only enhance the quality of work but also contribute to long-term client satisfaction.
Regular Inspections
Conducting regular inspections of outdoor electrical installations is essential. Over time, wear and tear can occur due to environmental factors. By routinely checking the condition of extenders, wiring, and fixtures, contractors can identify potential issues before they become significant problems.
Educating Clients
Educating clients about the importance of proper outdoor lighting and the role of extenders can foster trust and enhance client relationships. Providing clients with information on how to care for their outdoor electrical systems can lead to fewer service calls and increased customer satisfaction.
Conclusion
The exterior 2 gang extender is an invaluable tool for lighting contractors, providing essential support for outdoor electrical installations. By understanding its features, benefits, and installation processes, contractors can enhance their service offerings and ensure high-quality results for their clients. Emphasizing best practices and being prepared for common challenges will further solidify a contractor’s reputation as a reliable and knowledgeable professional in the field.
As the demand for outdoor lighting solutions continues to grow, staying informed about the latest tools and techniques, such as the use of exterior 2 gang extenders, will empower lighting contractors to deliver exceptional service and maintain a competitive edge in the market.
Get Your Exterior 2 Gang Extenders at LumenWholesale
Ready to elevate your outdoor lighting installations with the essential exterior 2 gang extenders? Look no further than LumenWholesale for all your lighting needs. We offer an extensive selection of spec-grade lighting products that meet the highest industry standards, ensuring your projects shine with reliability and performance. Take advantage of our unbeatable wholesale prices, free shipping on bulk orders, and the convenience of cutting out the middleman. Make your next project a glowing success with premium lighting at the best value. Visit LumenWholesale now and experience the difference quality and affordability can make.