Introduction to LED Strip Lights
LED strip lights have revolutionized the way lighting is utilized in both residential and commercial spaces. Their versatility, energy efficiency, and ease of installation make them a popular choice among lighting contractors. However, understanding the components that make up these systems is crucial for effective installation and maintenance. One such component is the 2 pin connector, which plays a vital role in ensuring a reliable electrical connection.
This article aims to provide a concise overview of the 2 pin connector used in LED strip lights, focusing on its functionality, installation, and best practices for lighting contractors. Within just five minutes, contractors can gain insights that will enhance their understanding and application of these connectors in various projects.
In addition to the 2 pin connector, LED strip lights typically feature a variety of other connectors and accessories that can enhance their functionality and ease of use. For instance, 4 pin connectors are often used for RGB (Red, Green, Blue) strips, allowing for color-changing capabilities that can create stunning visual effects in any environment. Understanding the differences between these connectors is essential for contractors who want to offer customized lighting solutions tailored to their clients’ needs. Moreover, the ability to integrate dimmers and controllers with these connectors can further expand the versatility of LED strip lighting, enabling users to adjust brightness and color settings based on their preferences.
Furthermore, the installation process for LED strip lights can vary depending on the application and environment. For example, contractors working in kitchens or bathrooms may need to consider moisture-resistant options and ensure that connectors are rated for such conditions. Additionally, proper soldering techniques and the use of heat shrink tubing can significantly improve the longevity and reliability of connections. By familiarizing themselves with these installation nuances, lighting contractors can not only enhance the performance of LED strip lights but also build a reputation for quality workmanship that clients can trust.
Understanding the 2 Pin Connector
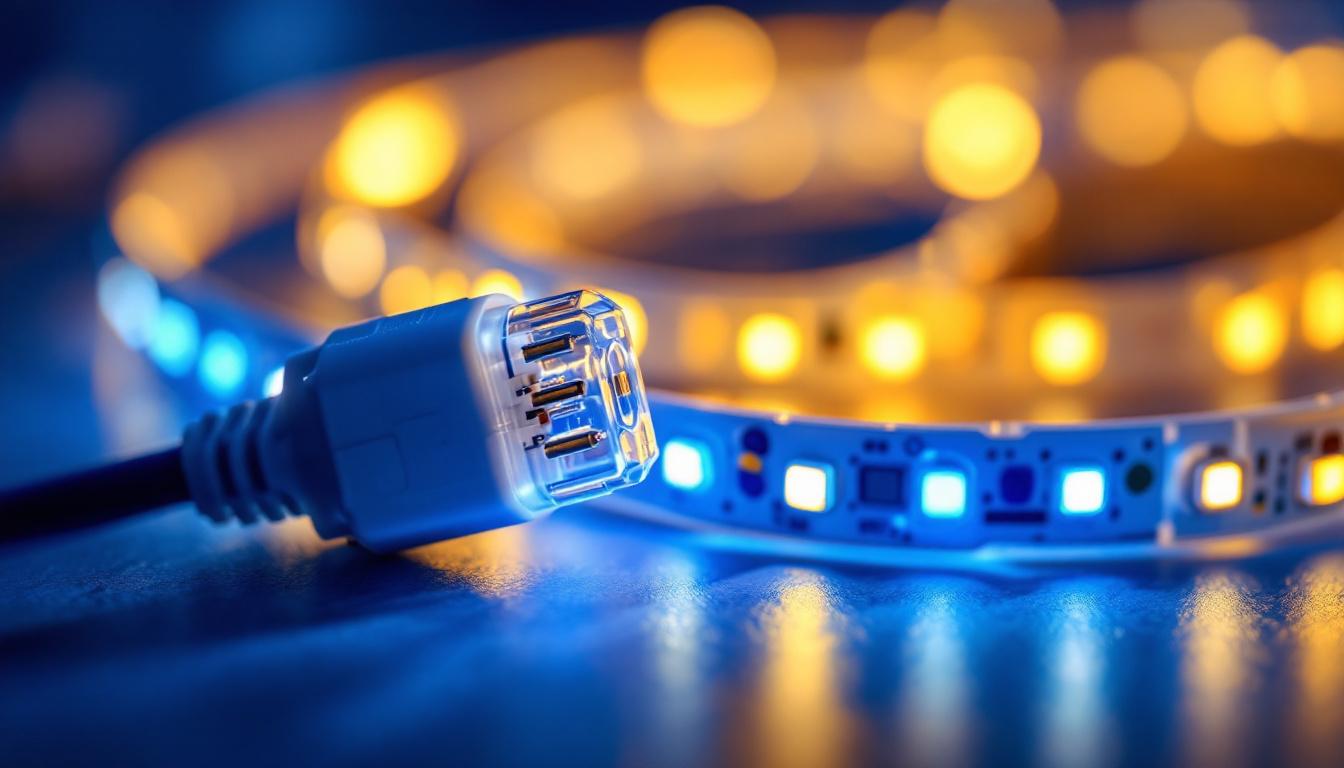
The 2 pin connector is a simple yet essential component that facilitates the connection of LED strip lights to a power source. Typically, these connectors are designed to ensure a secure and efficient electrical connection, which is crucial for the performance and longevity of the lighting system.
Components of a 2 Pin Connector
A standard 2 pin connector consists of two primary components: the male and female connectors. The male connector features exposed pins that insert into the female connector, creating a secure connection. This design minimizes the risk of accidental disconnection, which can lead to flickering lights or complete power loss.
Additionally, the materials used in manufacturing these connectors are typically durable and resistant to corrosion. This is particularly important in environments where moisture or dust may be present, as it ensures the longevity of the connection. Many manufacturers use high-quality plastics and metals that not only withstand environmental stressors but also maintain electrical conductivity over time, reducing the likelihood of failure.
Types of 2 Pin Connectors
There are various types of 2 pin connectors available on the market, each designed for specific applications. Some common types include solderless connectors, which allow for quick and easy connections without the need for soldering tools. These are particularly useful in projects where time is of the essence.
Another type is the waterproof connector, which is designed for outdoor or damp environments. These connectors often feature additional sealing mechanisms to prevent moisture ingress, ensuring that the lighting remains functional even in challenging conditions. Furthermore, there are also connectors that come with built-in strain relief features, which help to protect the wires from damage due to bending or pulling, thus enhancing the overall reliability of the connection.
In addition to these types, specialized connectors are available for high-power applications, which may include thicker gauge wires and enhanced insulation to handle increased electrical loads. These connectors are particularly beneficial in commercial settings where lighting systems are subjected to more rigorous use, ensuring safety and performance under demanding conditions. Understanding the specific requirements of your project can help in selecting the most appropriate type of 2 pin connector, thereby optimizing the efficiency and safety of your lighting installations.
Installation Process for 2 Pin Connectors
Installing a 2 pin connector is a straightforward process, but it is essential to follow best practices to ensure a reliable connection. The following steps outline a typical installation procedure that lighting contractors can follow.
Preparation
Before beginning the installation, it is crucial to gather all necessary tools and materials. This typically includes the LED strip lights, 2 pin connectors, a power supply, and any additional tools such as wire cutters or strippers. Ensuring that everything is on hand will streamline the process and reduce the likelihood of errors. Additionally, it’s wise to have a multimeter on hand for testing voltage and continuity, which can help troubleshoot any issues that may arise during installation.
Connecting the LED Strip Lights
To connect the LED strip lights using a 2 pin connector, start by cutting the strip to the desired length. Most LED strips come with designated cut points, making this step straightforward. Once the strip is cut, carefully strip the ends of the wires to expose the copper conductors. It’s important to strip just enough insulation to make a solid connection, as excessive stripping can lead to shorts or exposed wires that may cause safety hazards.
Next, insert the exposed wires into the corresponding slots of the 2 pin connector. It is essential to ensure that the positive and negative wires are connected correctly to avoid damaging the LED strip. Once the wires are securely in place, close the connector to lock them in. For added security, consider using heat shrink tubing or electrical tape around the connections to protect them from moisture and mechanical stress, especially if the installation is in a location prone to humidity or movement.
Testing the Connection
After the installation is complete, it is important to test the connection before finalizing the setup. Plug the power supply into an outlet and turn it on. Observe the LED strip lights to ensure they illuminate evenly and without flickering. If any issues arise, double-check the connections to ensure they are secure and correctly aligned. Additionally, it may be beneficial to monitor the lights for a few minutes to ensure they maintain a consistent brightness and color temperature, as this can indicate a stable connection. If the lights flicker or dim unexpectedly, it may be a sign of an inadequate power supply or a poor connection that needs to be addressed.
Common Issues and Troubleshooting
Even with proper installation, issues may occasionally arise when working with 2 pin connectors. Understanding common problems and their solutions can save time and frustration for lighting contractors.
Flickering Lights
Flickering lights are a common issue that can indicate a poor connection. If the LED strip lights flicker, it may be due to loose connections within the 2 pin connector. To resolve this, disconnect the power supply and check the connector for any loose wires. Reinsert any loose connections and test again.
No Illumination
If the LED strip lights do not illuminate at all, there may be a problem with the power supply or the connection itself. First, ensure that the power supply is functioning correctly by testing it with a multimeter. If the power supply is operational, check the 2 pin connector for any signs of damage or corrosion that may be preventing a proper connection.
Best Practices for Lighting Contractors
To ensure the success of projects involving LED strip lights and 2 pin connectors, lighting contractors should adhere to several best practices. These practices not only enhance the quality of the installation but also improve the overall customer experience.
Use Quality Components
Investing in high-quality 2 pin connectors and LED strip lights is essential for long-lasting results. Cheap components may save money initially but can lead to frequent replacements and repairs in the long run. Quality connectors are designed to withstand wear and tear, ensuring that the lighting system remains functional for years.
Document the Installation Process
Keeping detailed records of the installation process can be beneficial for future reference. Documenting the types of connectors used, the installation steps taken, and any issues encountered can help streamline future projects. This practice also provides valuable information for troubleshooting and maintenance.
Stay Updated on Industry Trends
The lighting industry is continually evolving, with new technologies and products emerging regularly. Staying informed about the latest trends and advancements in LED lighting and connectors can give contractors a competitive edge. Attending trade shows, participating in workshops, and engaging with industry publications are excellent ways to stay updated.
Conclusion
The 2 pin connector is a crucial component in the installation and operation of LED strip lights. By understanding its functionality, installation process, and potential issues, lighting contractors can enhance their skills and deliver high-quality lighting solutions to their clients. Adhering to best practices and investing in quality components will ensure that projects are completed efficiently and effectively.
With the knowledge gained from this article, lighting contractors can confidently approach their next LED strip lighting project, knowing they have the tools and understanding necessary to succeed. Whether working on residential or commercial installations, the ability to effectively utilize 2 pin connectors will undoubtedly contribute to the overall quality and reliability of the lighting systems they create.
Get Your Premium 2 Pin Connectors at LumenWholesale
Ready to elevate your LED strip lighting projects with the highest quality 2 pin connectors? Look no further than LumenWholesale, where we specialize in providing lighting contractors with spec-grade lighting products at unbeatable wholesale prices. Say goodbye to local distributor markups and hello to our extensive selection that meets rigorous industry standards. With LumenWholesale, you’ll enjoy the convenience of bulk buying with free shipping, ensuring you get the best value without any hidden fees. Make your next project shine with reliability and performance by choosing Wholesale Lighting at the Best Value from LumenWholesale.